
The Ultimate USB Stick Setup
For my birthday I got a new USB drive. It's the tiny but strong Kingston DataTraveler SE9 with 32GB capacity. The perfect device to have always on your keyring.
 32GB is a lot of space, so why not fill some of it with useful stuff you might need from time to time:
- Windows 7 Installer, because a Windows reinstalls tend to happen suddenly
- Some portable Windows tools, to make that System more bearable
- Some Linux Live system(s) for data recovery and general PC maintenance
- The Arch Linux install image, just in case someone needs assimilation
Here's how I set it up.
Partitioning
The first question to ask is how to partition the drive. My main requirement was to be as cross platform compatible as possible. At least Linux and Windows should not have any problems accessing the drive, Mac support isn't as important. This only leaves FAT and NTFS, but NTFS write support under Linux is nothing granted at all, so I decided for FAT32 as the system of choice. This limits the maximum file size to 4GB, but that's the sacrifice to make for maximum compatibility.
Windows will not mount any other than the very first partition on removable disks. You could theoretically add additional Linux partitions after it, but I decided to go for a single partition spanning the whole disk.
For maximum compatibility (especially because the Windows bootloader tends to be picky) I highly recommend to do the partitioning and formatting on a Windows system. This can be easily done through the DISKPART utility.
Open an Administrator shell by typing cmd in the Windows start menu, then right-click the cmd.exe and select Run as Administrator. In the shell run DISKPART and use the following commands:
LIST DISK
(check the number of your USB stick for the next command)
SELECT DISK 2
CLEAN
CREATE PARTITION PRIMARY
SELECT PARTITION 1
ACTIVE
FORMAT FS=FAT32 LABEL=USBSTICK QUICK
ASSIGN
EXIT
Your thumb drive is now formatted and ready to use. Keep the shell open for the next step and check which drive letter was assigned in the Windows Explorer.
Windows Installer
From time to time you need to reinstall Windows. Instead of looking for the DVD every time it's more handy to have the installer ready on the USB drive.
Doing so is relatively simple. First copy the contents of your Windows 7 DVD to the new Drive (F: in my case). Then install the NT bootloader. On your admin shell use the following commands:
F:
cd BOOT
BOOTSECT.EXE /NT60 F:
Useful Utilities
While we're still in Windows, why not install a few useful, portable Utilities on the stick. The simplest way to do this is the PortableApps Suite. Download their installer, run it and let it install to your USB drive.
Run the start.exe and pick Install Apps from the Apps menu. Select what you like and wait til the tools were downloaded and installed on your USB drive. Here are the ones I picked:
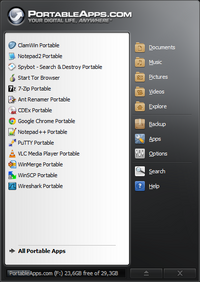
- 7-Zip
- AntRenamer
- CDEx
- ClamWin
- Google Chrome
- Notepad2
- Notepad++
- PuTTY
- Spybot
- VLC
- WinMerge
- WinSCP
Additional portable tools can be easily adde to their menu by installing them into the PortableApps folder and selecting Refresh App Icons from the Apps menu.
I did this for Tor Browser and Wireshark.
Linux ISOs
I'd like to have a few useful rescue systems and installer ISOs available. So I downloaded the following ISO files and put them into an iso directory on the stick:
- pmagic_2012_11_30.iso (Rescue System)
- systemrescuecd-x86-3.1.2.iso (Rescue System)
- grml32-full_2012.05.iso (Rescue System)
- archlinux-2012.12.01-dual.iso (Arch Linux Installer)
- memtest86+-4.20.bin (Memory Test Utility)
3 different rescue systems might be overkill but I wasn't sure which one I liked best, so I just took them all  .
.
Grub 2 Setup
Now on to the Grub setup. For this you need to boot to a Linux system with Grub 2 availble. Arch Linux works fine. Grub is the bootmanager that will make all the Live ISO images and the Windows 7 installer available when booting from the stick.
Mount the stick to somewhere:
sudo /dev/sdc1 /mnt
Then install Grub to the MBR:
sudo grub-install --force --no-floppy --root-directory=/mnt/ /dev/sdc
You now should have a /mnt/boot directory.
One more thing I'd like to have is proper German support in Grub itself. To do this a keymap needs to be created. Turns out that this needs a script to convert an X keyboard map to a map Grub understands. I followed this (German) post to get the script from a Debian package:
wget http://ftp.de.debian.org/debian/pool/main/c/console-setup/console-setup_1.88_all.deb
ar console-setup_1.88_all.deb
tar -xzvf data.tar.gz
./usr/bin/ckbcomp de | grub-mklayout -o de.gkb
The keymap needs to go into /mnt/boot/grub/layouts:
mkdir /mnt/boot/grub/layouts
cp de.gkb /mnt/boot/grub/layouts/
Next we need a grub config file in /mnt/boot/grub/grub.cfg. Grub 2 is able to directly boot a kernel that resides inside of an ISO file. But once this is done, the kernel needs to be able to find the rest of the OS in the ISO. Nearly all Live distributions have some way to do this via a kernel argument like findiso, iso_loop or similar. Unfortunately it's not standardized, so the exact syntax varies between distributions.
Anyway, here are the entries for the above ISOs and the Windows bootloader. It also sets the keymap to German:
- /mnt/boot/grub/grub.cfg
terminal_input at_keyboard
keymap de

menuentry 'Parted Magic' {
    set iso="/iso/pmagic_2012_11_30.iso"
    loopback loop $iso
    linux (loop)/pmagic/bzImage iso_filename=$iso boot=live
    initrd (loop)/pmagic/initrd.img
}

menuentry "SystemRescue CD" {
    set iso="/iso/systemrescuecd-x86-3.1.2.iso"
    loopback loop $iso
    linux (loop)/isolinux/rescue64 setkmap=de isoloop=$iso
    initrd (loop)/isolinux/initram.igz
}

menuentry "GRML" {
    set iso="/iso/grml32-full_2012.05.iso"
    loopback loop $iso
    linux (loop)/boot/grml32full/vmlinuz boot=live noeject noprompt findiso=$iso toram bootid=grml32full201205 live-media-path=/live/grml32-full/
    initrd (loop)/boot/grml32full/initrd.img
}

menuentry "ArchLinux 32 Bit" {
    set iso="/iso/archlinux-2012.12.01-dual.iso"
    loopback loop $iso
    linux (loop)/arch/boot/i686/vmlinuz archisolabel=ARCH_201212 img_dev=/dev/disk/by-label/FILES img_loop=$iso earlymodules=loop
    initrd (loop)/arch/boot/i686/archiso.img
}

menuentry "ArchLinux 64 Bit" {
    set iso="/iso/archlinux-2012.12.01-dual.iso"
    loopback loop $iso
    linux (loop)/arch/boot/x86_64/vmlinuz archisolabel=ARCH_201212 img_dev=/dev/disk/by-label/FILES img_loop=$iso earlymodules=loop
    initrd (loop)/arch/boot/x86_64/archiso.img
}

menuentry "Memtest 86+" {
    linux16 /iso/memtest86+-4.20.bin
}

menuentry "Install Windows 7" {
    search --no-floppy -l -s WIN7INSTALL
    chainloader +1
}
That's it. You now can umount /mnt and boot from your stick.
Still Missing
I'd like to add some HTML based documentation for stuff I regularly need, like the jQuery API or PHP docs. These would come in handy when not having a network connection (on a train or plane). Something like dochub.io but without the server requirement would be nice.
I also like to checkout truecrypt for having a cross system accessible, encrypted container available.
Got any other tips for the ultimate USB every-day-carry stick?