
RetroPie
Over the last few months I worked on a little Raspberry Pi project. It took so long because I ordered stuff from China and it all took a while to arrive. And because of bad planning I did not order everything at once…

So what does it do? It's a mini game console similar to the NES Mini and SNES Mini only based on a Raspberry Pi and not limited to a small selection of builtin games.
What follows is a description of how I set it all up.
RetroPie Setup
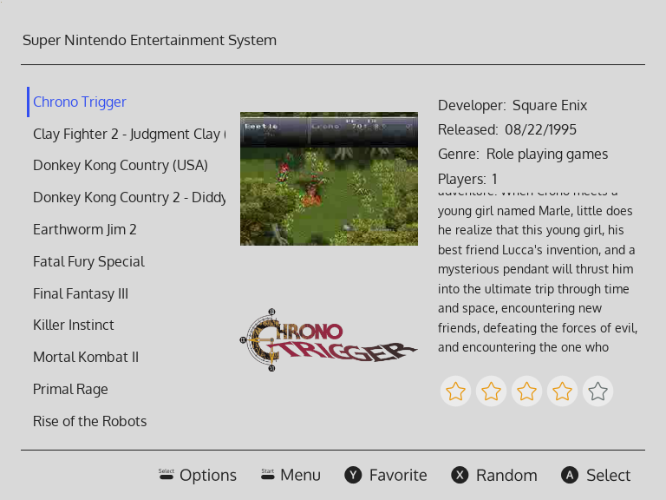
Heart of the system is the RetroPie distribution. It's a disk image aimed at the Raspberry that has a pre-configured system with all the emulators you want and a nice graphical UI called “Emulation Station”.
RetroPie is Rasbian based so the basic installation is just the same. You flash the image to an SD card and enable SSH access via creating the empty ssh file on the boot partition.
Controller Setup
After flashing the system you want to configure your configure your controllers first. I bought two Bluetooth 8bitdo SN30 Pro controllers. To do the initial setup, I used my wired XBox controller (because I didn't want to attach a keyboard to the RPi).
For using the 8bitdo controllers, first upgrade their firmware to the latest version (using a windows PC).

The controllers can be used in different modes. The Android mode is the one that works best for RetroPie. Because of some known weirdness you need to configure each controller twice before the shoulder trigger buttons work.
Here's what to do:
- use the XBox controller connected via USB (or a keyboard)
- configure input when prompted
- select “Retropie” in Emulation Station
- select “Bluetooth” in the menu
- in a quick fashion do
- turn on the 8bitdo controller in Android mode by pressing Start+B (one green LED flashes)
- hold pair button at the top for three seconds (all LEDs flash in Knight Rider mode)
- Select “Register and Connect to Bluetooth Device”
- Pick your device from the list (remember the ID if you have multiple, so you do not configure the same one twice later)
- Select “1 DisplayYesNo”
- The controller should rumble and a success message should pop up
- Repeat for your other controllers
- Select “D Set up udev rule”
- select one of the 8BitDo devices
- exit and reboot the system
- press the start button on the XBox controller and select “Configure Input”
- turn on the 8bitdo controller by pressing start
- wait for the rumble
- hold the A button until the configuration menu appears
- follow the directions
- the trigger buttons will not register
- repeat the whole process again for the same controller
- this time the trigger buttons will work
- repeat for other controllers
- you can now remove the X-Box controller
After that your 8bitdo controllers are paired and can be turned on with the “start” button anytime. They turn off by themselves after a while of inactivity or when you hold the “start” button.
Roms and Scraping
For legal reasons RetroPie does not come with any roms (the dumps of the original console game cartridges). You need to uhm… obtain them somewhere else. You'll figure it out.
Retropie exposes a “Roms” share via CIFS/SMB so you can easily copy them to the pie via the network.
Emulation Station can show screenshots, descriptions and meta information. But all that data needs to be downloaded from the Internet.
To do so I basically followed this blog post. However I did it by SSH and also downloaded video previews. Be sure to first stop Emulation Station, then follow the linked description to install and run Selph's Scraper.
$> killall emulationstation
$> sudo RetroPie-Setup/retropie_setup.sh
These were the settings I used:

Theme
The default them of Emulation Station is nice, but I wanted something a little more interesting. There are lots of themes but only a few work with Video Previews and newer features of Emulation Station (like favorites and custom collections).
It took me a while but I finally settled on the switch theme.
Hardware Mods
All of these are completely optional, but it was a fun thing to do. I added LEDs, a power switch and a fan. Let's start with a breadboard schematic:

I added four LEDs in blue, red, yellow and green and a simple push button to the Pi via it's GPIO interface. In addition a fan is connected that can be switched on and off through a transistor.
LEDs
Using this handy Resistor Calculator and the specs I got from the vendor, I figured that I needed a 15Ω resistor for the blue LED and 68Ω resistors for the others. However when looking at the resulting brightness levels, it turned out that the green LED was weaker than the others. In the end I used 330Ω for all but the green LED which got a 47Ω resistor 🤷.
The blue LED is used as a combined power and activity LED. It's on by default and flickers off, when the file system on the SD card is accessed. This is supported by the Raspian OS through enabling a parameter in the /boot/config.txt file:
- /boot/config.txt
# enable inverse activity LED on GPIO 21
dtoverlay=pi3-act-led,gpio=21,activelow=on
The other LEDs are used to signal the current CPU temperature. See further down for the script.


Power Switch
The power switch is also very simple. Shorting GPIO3 and ground will power on the Pi by default. If you want it to also gracefully shutdown the Pi, you need another entry in the /boot/config.txt file:
- /boot/config.txt
# shut down on buton press
dtoverlay=gpio-shutdown
Heatsinks
Emulating stuff can be CPU intensive. The Raspberry 3 will automatically throttle the CPU when it reaches 82°C. I wanted to avoid this. So I ordered a simple heatsink kit.
Unfortunately the CPU sink was about a millimeter too high to fit the fan into the small case I had. So instead I used a sink I had removed from an old graphics card a while ago. Since it was also slightly too high, I put a Dremel to it.
To avoid to accidentally short anything on the Pi with the larger heat sink, I put a card board insulator on the board. I made it by printing the official mechanical drawings and then cutting out the part I needed. Note: I had to print the PDF at 90% size to make it a 1:1 size YMMV.


Fan
The tiny fan I added makes quite some noise so I wanted it to run only when needed. A thread on the Raspi Forum explained how to do that with a NPN transistor.
I drilled some holes into the case as air intake. The fan is mounted with four M3 screws.


Temperature Control Script
To control the red, yellow, green LEDs and the fan I created a simple Python script:
- /usr/local/bin/temp.py
#!/usr/bin/python

import RPi.GPIO as GPIO
from time import sleep

# pins for the LEDs
pin_g = 22
pin_y = 27
pin_r = 17
pin_fan = 14

# temperature thresholds in Celsius
low = 55
mid = 65
high = 75

GPIO.setmode(GPIO.BCM)
GPIO.setup(pin_g, GPIO.OUT, initial=GPIO.LOW)
GPIO.setup(pin_y, GPIO.OUT, initial=GPIO.LOW)
GPIO.setup(pin_r, GPIO.OUT, initial=GPIO.LOW)
GPIO.setup(pin_fan, GPIO.OUT, initial=GPIO.LOW)

try:
    tfile = open('/sys/class/thermal/thermal_zone0/temp')
    while True:
        tfile.seek(0)
        temp = float(tfile.read()) / 1000
        print temp

        GPIO.output(pin_g, temp > low)
        GPIO.output(pin_y, temp > mid)
        GPIO.output(pin_r, temp > high)
        GPIO.output(pin_fan, temp > mid)

        sleep(1);
except:
    print "exiting"
finally:
    tfile.close()
    GPIO.cleanup()
The temperature is read every second. It will turn on the green LED on temperatures over 55°C, the yellow over 65°C and the red one over 75°C. Over 65°C it also turn's on the fan.
To make the script run on boot I added a call to it to /etc/rc.local:
- /etc/rc.local
# run the temperature watch script in the background
/usr/local/bin/temp.py >/dev/null &
Portability
One of the goals was to make this as portable as possible, so I could take this with me to friends or on vacation. All you need is a TV with HDMI and you're ready to play.
To do so I found me a small pouch on Amazon that holds the Raspberry, the controllers and cables needed. To make everything fit, I cut out the divider that was in the middle. The controllers are protected with simple pouches that are originally intended for sun glasses.


Things I learned
- When you accidentally short the 3.3V and the 5V pins of the Raspberry, you fry the electronics and can buy a new one.
- When your power supply is not delivering enough Amps, the CPU will be limited to 600Mhz no matter what temperature. I'm using this one now.
- Order times from China vary wildly. When you order something from the same vendor your second order may arrive before the first, even when the second was ordered nearly a month later.
- Even the cheap orders from China add up to significant amounts.
- I sometimes enjoy these little hardware projects even more than writing software. My software projects may suffer from that.
- I'm somewhat clumsy with a soldering iron. Maybe I should find a smaller one.