
Paper Backup (3) User Interface
This is the third and final part of the three part series describing my automatic paper backup system. After the scanner is working and we have a bunch of scripts for scanning and uploading, all that is missing is a nice user interface. That's what this part is about.
- User Interface ← you are here
The menu that wasn't
As you may remember from the first part, the software is running on a Raspberry Pi with an attached Touch Screen. The goal is to be able to just press a few buttons on that screen to automatically scan some paper, assign a keyword to it and upload it to the right user's account.
Sounds easy enough. A simple GUI to select a user and a keyword. Unfortunately I couldn't find any existing tool to display a full screen menu optimized for a tiny screen with low resolution. So I set out to built one on my own.
This turned out to be hard.
 My first try was based on Python and libavg. libavg is a graphics library we had used in some projects at work so I knew it would be able to handle my tasks, but I had never worked with it myself before. The documentation is very sparse, Stackoverflow has just about two handful of answers related to it, but I succeeded in building a simple menu.
But to my disappointment, I couldn't get it working on the Raspberry. The libavg included in Raspbian was too old to even run my app and manually installing as described in their wiki just resulted in a black screen. Failure number 1.
 My next idea was to use technology I'm familar with. Javascript and HTML. My friend Anika pointed me to the new flexbox CSS3 features which helped me building my menu in no time.
But how to make it an desktop app that can execute local scripts? My plan was to use the awesome node-webkit which combines the Chrome renderer with nodejs. Too bad I hadn't checked for arm compatibility. There are no working binaries for a current Rasbian and building it seems to be a major project. Failure number 2.
PiMenu - A tile menu
So I started googling what else one can use to create a really simple GUI without digging into QT, GTK, C and possibly cross compiling. The answer is TkInter, a simple TCL/Tk based Python library. So I started building the same thing a third time.
And right in the middle of it I decided to change my GUI concept a bit. Instead of going for a tab-based interface, I took inspiration in Windows 8's Metro design. The result is a simple, but nice looking menu that can display an arbitrary number of button tiles. Everything is configured in a yaml config and tiles can be arranged in nested pages.
Download is available from this Github Repository.
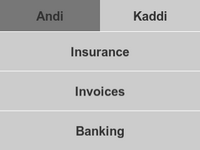
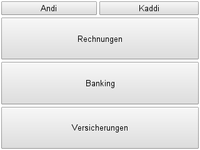
Here are some screenshots:


As you can see, tile sizes auto adjust depending on their number and everything is reasonably big for easy selection on the tiny screen.
TkInter and Python are already installed on Rasbian, so all that needs to be added is the yaml library:
$> sudo apt-get install python-yaml
The final Setup
First we configure the menu to call our scan script with the parameters gathered from the menu:
- pimenu/pimenu.sh
#!/bin/bash

# first parameter is our user
USER=$1
shift

# all other parameters are keywords we join together
KEYWORD=$(IFS=/; echo "$*")

# scan it baby
/home/pi/scan/scan.sh "$USER" "$KEYWORD"
Next X is configured to automatically start the menu only1) by creating an .xsessionrc file:
- ~/.xsessionrc
# load the touch screen calibration
. /etc/pointercal.xinput

# start the pi menu in fullscreen mode
/home/pi/pimenu/pimenu.py fs
and make it executable:
$> chmod 755 .xsessionrc
Finally reconfiure the raspberry to autoboot into X
$> sudo raspi-conf
- 3 Enable Boot to Desktop/Scratch
- Desktop Log in as user 'pi' at the graphical desktop
Screensaver
Now that we're done with the actual setup it's time to tune the whole thing for permanent use. The first thing you will notice is that the display blanks automatically after 10 minutes. That's a good thing. But it does not disable the backlight of the screen. That's a bad thing. Luckily there's a workaround.
Install xscreensaver:
$> sudo apt-get install xscreensaver
Create a minimal configuration to blank the screen after 3 minutes (or whatever you prefer)
- ~/.xscreensaver
timeout:        0:03:00
mode:           blank
Create the control script:
- ~/.xbacklight.sh
#!/bin/sh

# Make sure there's backlight control
ls /sys/class/backlight/* >/dev/null 2>&1 || exit

process() {
    while read line; do
        case "$line" in
            UNBLANK*)
                echo 0 | sudo tee /sys/class/backlight/*/bl_power 1>/dev/null
            ;;
            BLANK*)
                echo 1 | sudo tee /sys/class/backlight/*/bl_power 1>/dev/null
            ;;
        esac
    done
}

xscreensaver-command -watch | process
Make it executable:
$> chmod 755 .xbacklight.sh
And finally adjust the .xsession startup procedure to start the screensaver daemon and our watcher script:
- ~/.xsessionrc
# load the touch screen calibration
. /etc/pointercal.xinput

# start screensaver and backlight script
xscreensaver -no-splash &
/home/pi/.xbacklight.sh &

# start the pi menu in fullscreen mode
/home/pi/pimenu/pimenu.py fs
Now the screen goes totally dark after 3 minutes of inactivity and just needs a little touch to wake up again. Perfect.
Bonus: Build a case
