
Paper Backup (1) Scanner Setup
I wrote about my Digital Backups before. But this talk by Bdale Garbee raises some good points: what happens when your house burns down? Can you prove you just had bought this Van Gogh right before the incident? What papers would your insurance need? What exactly is insured? And who actually is your insurance? Chances are that the answers to all these questions just have been burned.
So better back up that stuff. Unfortunately a lot of important data still arrives via snail mail on paper. I wanted a simple solution to archive any paper that arrives in a simple way. So I built one.
The whole system consists of a document scanner attached to a Raspberry Pi with a touchscreen and some custom software.
This is the first post of a three part series describing how I build the whole system. Part one explains the basic setup of the Raspberry, the scanner and the SANE scanner software.
- Scanner Setup ← you are here
Raspberry Pi with Touchscreen
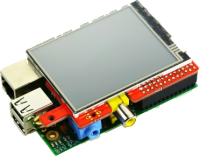 To control the whole scanning process I want to use a touchscreen. I found the Watterott 2.8" display for 30 EUR at amazon.de.
It's ready to use and just needs to be attached to the Raspberry (I'm using an old model B here). Watterott provides a preconfigured SD Card image. It's a standard Raspian but with proper kernel and configs to use the display. Just install it on the SD card (be sure to give the correct, unmounted device of your SDcard):
$> wget http://www.watterott.net/fbtft/2014-06-20-wheezy-raspbian-2014-07-25-fbtft-rpi-display-rev2.zip
$> sudo dd bs=4M if=2014-06-20-wheezy-raspbian-2014-07-25-fbtft-rpi-display-rev2.img of=/dev/mmcblk0
After booting up, the display will already work and show the IP address. But the display input still needs calibration. Start X as root to do that:
$> ssh pi@<yourraspberry'sIP>
Password: raspberry
$> sudo startx
For calibration best use some kind of stylus (I used a spare one from my old NDS).
More details on using the Touchscreen will follow in the third installment of this series.
Fujitsu ScanSnap S1300i + SANE on Rasbian

The scanner I bought is Fujitsu ScanSnap S1300i for about 200 EUR. It's 150 DPI, has an automatic document feeder and scans in Duplex mode.
Getting the S1300i to run requires a very recent SANE version. The one distributed as package in Raspian (or current Ubuntu for that matter) will not work. Thus we'll compile the thing ourselves right on the Raspberry:
$> sudo apt-get install libusb-dev build-essential git-core
$> git clone git://git.debian.org/sane/sane-backends.git
$> cd sane-backends
$> BACKENDS=epjitsu ./configure --prefix=/usr --sysconfdir=/etc --localstatedir=/var
$> make
$> sudo make install
Next we need the proper firmware for the scanner. You can extract it from the CD that came with the scanner. The intro in /etc/sane.d/epjitsu.conf explains how to do it. The file you need is called 1300i_0D12.nal. If you're a lazy bastard1) and rather execute random binaries downloaded from the Internet, a quick google search will bring you to this gitrepo which helpfully provides the needed file. Which ever way you go, the file needs to be copied to the right location:
$> sudo mkdir -p /usr/share/sane/epjitsu/
$> sudo cp 1300i_0D12.nal /usr/share/sane/epjitsu/
Time to test the scanner - for now we do that as root. Permission setup is is the next step. First check it's connected:
$> sudo sane-find-scanner -q
found USB scanner (vendor=0x04c5 [FUJITSU], product=0x128d [ScanSnap S1300i]) at libusb:001:011
found USB scanner (vendor=0x0424, product=0xec00) at libusb:001:003
I have no idea what the second line is, but the first one is good.
Accessing it is the next step:
$> sudo scanimage -L
device `epjitsu:libusb:001:011' is a FUJITSU ScanSnap S1300i scanner
Awesome. Now place some document in the feeder and scan it:
$> sudo scanimage >out.pnm
out.pnm should now contain a black'n'white scan of your document.
SANE Permissions
Time to fix the permissions to allow the pi user to access the scanner. First copy the udev rules file that comes with SANE:
$> sudo cp sane-backends/tools/udev/libsane.rules /etc/udev/rules.d/60-libsane.rules
Next add the user to the scanner group2):
$> sudo usermod -a -G scanner pi
Now unplug the scanner and plug it in again. Also log out and in again. Now scanimage should work as user:
$> scanimage -L
device `epjitsu:libusb:001:004' is a FUJITSU ScanSnap S1300i scanner
Setup the SANE Daemon
Even though this series is about automated scanning, it's nice to be able to access the scanner on demand from other desktop machines. That's what saned is about - sharing the scanner over the local LAN.
First the local LAN needs to be defined. It's configured in /etc/sane.d/saned.conf:
data_portrange = 10000 - 10100
192.168.1.0/24
Next just start the daemon manually (with permission drop to the user pi):
$> sudo saned -a pi
On the client side install SANE and some frontend (I used Simple Scan) from your distribution's package manager. All you need to do is edit /etc/sane.d/net.conf and add the IP address of your Raspberry. Fire up Simple Scan and you should be able to scan remotely.
The last touch is to make saned start automatically when the raspberry boots. Simplest method is adding it to /etc/rc.local just add the following line right before the exit 0:
saned -a pi
