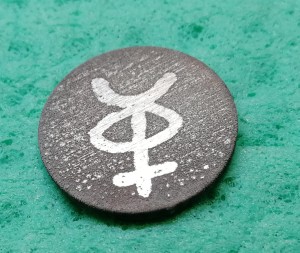
Electro Etching
 For same project I made the book for, I also needed some tokens. I recently had learned about electroetching, so this was a good time to give it a try.
Electroetching is a metal etching process that involves the use of a solution of an electrolyte, an anode, and a cathode.
I ordered 100 aluminium disks1) off eBay and started to figure out how to do it.
First I needed a way to mask the parts that should not be etched. The typical approach is to use vinyl tape and cut it using a laser cutter. But since I don't have access to one and didn't feel like spending too much money on this part of the project, I tried something else.
I still had an Edding 751 paint marker laying around. I drew a symbol on the aluminium, let it dry and then used turpentine to wipe it off again. That worked fine, so that part was done.
For the etching to work the positive contact needs to be attached to the metal to etch. Since I wanted to etch multiple disks at once, I needed to figure out how to connect them all. My first idea was to use an isolated wire with some exposed knots in it, taped to the back of the disks… Even though it worked okay'ish, it was a big mess to handle.
So instead I designed a simple jig in TinkerCad that holds a metal plate and has holes for 5 disks which lay flat on the plate. This turned out to work fine, though I had to improve the contact by “sprinkling” some thin wire pieces between the plate and the aluminium disks.
For the negative pole, I used an old 3.5 harddisk spacer bracket. I connected my homemade power supply with crocodile clamps and started experimenting. In the end I used two teaspoons of salt in about 150ml of water and I applied 7 Volts for about 25 to 30 minutes.