Humidity Control with Home Assistant
 Our basement tends to be humid. Too much humidity is bad. So regularly airing it is important. But when is the best time to open a window?
Answering this question is surprisingly complicated. Generally speaking you want to exchange humid air inside with less humid air from outside. Now all you need to know is the humidity inside and outside - question answered. Right? Well… here's how I did it using my new Home Assistant setup.
Weather Station
The first step is to know the humidity outside. That requires some kind of sensor. And of course, when I put a sensor for humidity outside, why not a whole weather station?
It was surprisingly hard to find a straight answer on what weather station to buy, if you want an easy integration with Home Assistant.
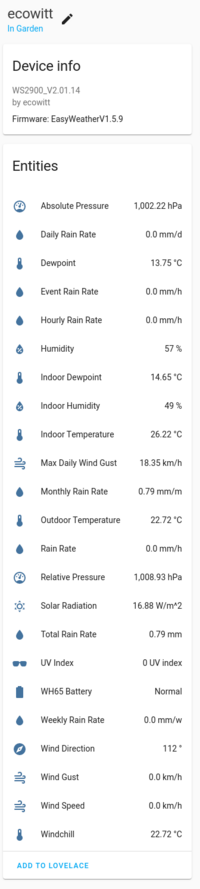
It seems the Netatmo System is relatively well supported out of the box. But the full system with rain and wind sensors is over 300 EUR  .
.
After some more research, I found that many of the cheaper WiFi weather stations work with the online services Weather Underground or EcoWitt. For my home setup I prefer my sensors to work locally if possible.
Luckily, many of the stations also allow you configure a custom server, so that's the way I went.
I bought a Sainlogic WS35001). Once the hardware is assembled, you need to use their (ugly) app to configure the WiFi and the services it shall send the data to. Instead of registering at any of the commercial services, use the next button until you reach the “Customized” tab. There simply select the Ecowitt protocol, use the IP address of your Home Assistant instance and set the path and port to / and 4199 respectively.

Next, a custom integration that speaks the Ecowitt protocol is needed. Unfortunately the Ecowitt Weather Station integration for home-assistant by @garbled1 has a couple of unfixed bugs and isn't working in current HA setups. But thanks to the magic of OpenSource, there are forks available with all the necessary fixes needed. I'm currently using the 0.0.7 beta release of PoppyPop's fork.
Once the repository is added to HACS, installed and HA is restarted, the integration can be added in the configuration and a few seconds later all the beautiful weather data will start flowing into your Home Assistant.
Indoor Sensors
To compare the outside with the inside, we also need sensors in the house. The weather station' base unit already has sensors, but it's in the office. Not the basement.
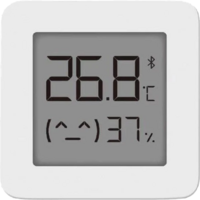 When you do a little research on available remote readable hygrometers you will quickly come across the Xiaomi Mijia devices. Simple, battery powered hygro- and thermometers that send their data via Bluetooth Low Energy (BLE) protocol. They are less than 5EUR a piece.
The first thing I did, was to replace their proprietary firmware with a open source one. Not only does that firmware make it easier to communicate (no more encryption of the data) but it also transmits battery information over the air.
The firmware I used is the ATC MiThermometer by atc1441. There is also a more advanced fork by pvvx, but I had trouble with that in a later step. The original one seems good enough.
Flashing works over the air through the browser2). It's quite amazing what's possible with modern browser technology.
Tip: after flashing the device, it will change it's Bluetooth name toATCfollowed by 6 letters/digits. Click connect again to find the new device and physically label the sensor accordingly to avoid confusion later.
The 6 characters in the name are the last 3 bytes of the device's MAC address. The first 3 bytes are alwaysA4:C1:38. So if your device's Bluetooth name isATC123456, its MAC isA4:C1:38:12:34:56.
Next we want to read the data. There is an official Home Assistant integration, but that works in active mode. This means it will actively poll each registered device. But this is not necessary at all.
Bluetooth Low Energy sends advertising beacons every few seconds. The ATC firmware puts all relevant data into these beacons. This means all we need to do is listening to the BT spectrum and fish out the data. This saves energy and no polling is needed.
This is all implemented in the well maintained Passive BLE Monitor integration which can easily be installed via HACS.
Once installed, you can add it via integrations in the HA configuration. You can let it auto-add all found devices or you can manually add the devices by MAC address. I chose the latter.
Done. We have a way to read temperature and humidity in our rooms.
But wait. The Integration uses the builtin Bluetooth adapter of the Raspberry my Home Assistant is installed on. That's upstairs. Bluetooth range is not good enough to see the sensors in the basement. We need another solution.
A Bluetooth capable device is needed that can read the BLE beacons and transmit the data via the network to Home Assistant.
ESPHome and a simple 5EUR ESP32 to the rescue.
Similar to the integration above, ESPHome also has a passive BLE monitor component and it has support for the ATC firmware beacons3)).
The setup is relatively straight forward. All you need is the MAC address of the devices to monitor. Here's my setup for two Mijias in the basement:
substitutions:
  devicename: esp32-01

esphome:
  name: $devicename
  platform: ESP32
  board: esp32dev

# Enable logging
logger:

# Enable Home Assistant API
api:

web_server:
  port: 80

ota:
  password: "5da04df1df87bf6c2b29589fa2e8222"

wifi:
  ssid: "W00t"
  password: !secret wifi_password

  # Enable fallback hotspot (captive portal) in case wifi connection fails
  ap:
    ssid: "${devicename} Fallback Hotspot"
    password: "nxMaafaSADes"

captive_portal:

########## Setup #######################

esp32_ble_tracker:
  # https://github.com/pvvx/ATC_MiThermometer/issues/89#issuecomment-821815020
  scan_parameters:
    active: false
    interval: 211ms
    window: 120ms

time:
  - platform: homeassistant
    id: homeassistant_time

text_sensor:
  - platform: version
    name: "${devicename} - Version"
    icon: mdi:cube-outline

binary_sensor:
  - platform: status
    name: "${devicename} - Status"
    device_class: connectivity

  - platform: ble_presence
    mac_address: "A4:C1:38:35:3B:C7"
    name: "ATC 353BC7 Tracker"

  - platform: ble_presence
    mac_address: "A4:C1:38:E1:36:C7"
    name: "ATC E136C7 Tracker"

sensor:
  - platform: wifi_signal
    name: "${devicename} - Wifi Signal"
    update_interval: 60s
    icon: mdi:wifi

  - platform: uptime
    name: "${devicename} - Uptime"
    update_interval: 60s
    icon: mdi:clock-outline

  - platform: atc_mithermometer
    mac_address: "A4:C1:38:35:3B:C7"
    temperature:
      name: "ATC 353BC7 Temperature"
    humidity:
      name: "ATC 353BC7 Humidity"
    battery_level:
      name: "ATC 353BC7 Battery Level"
    battery_voltage:
      name: "ATC 353BC7 Battery-Voltage"

  - platform: atc_mithermometer
    mac_address: "A4:C1:38:E1:36:C7"
    temperature:
      name: "ATC E136C7 Temperature"
    humidity:
      name: "ATC E136C7 Humidity"
    battery_level:
      name: "ATC E136C7 Battery Level"
    battery_voltage:
      name: "ATC E136C7 Battery-Voltage"
 Thanks to ESPHome all configured sensors will pop up right away in Home Assistant.
All that's left is a 3D printed enclosure and we're done with the hardware requirements.
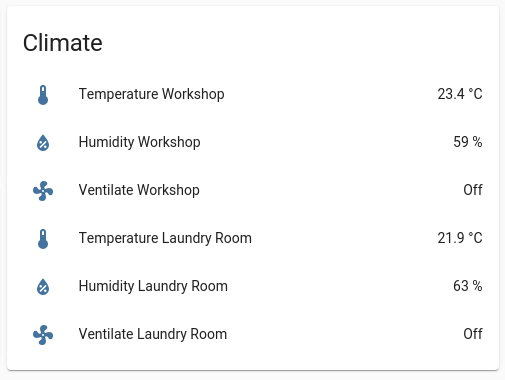
To air or not to air 💀
It's finally time to see if we should open a window or not. Just compare the outside humidity delivered by the weather station with the humidity measured by the Mijia…
No. Not so fast.
Humidity measured by these devices is relative humidity measured as a percentage. 100% humidity means there is as much water in the air as the air can take. Any more water will immediately form droplets and fall to the ground.
But how much water the air can carry depends on the temperature4). Warmer air can carry more water than cold air.
So imagine it's warm outside and cool inside – like in my basement in summer. My basement is at 60% relative humidity, the outside is at 50%. Should I open the window? Probably not. I would bring the hot air in, it would cool down and hold less water, effectively raising the relative humidity. Opening the window would be a bad idea.
To decide if it's safe to open the window, we first need the absolute humidity in g/m³.
Luckily there is another custom integration for that. The Thermal Comfort integration can calculate the absolute humidity from a given temperature and relative humidity.
After installing via HACS, the configuration has to be done in YAML for all your rooms and their sensors. Here's my setup for the weather outside, the base station in the office and 4 Mijias:
- /config/packages/thermal_comfort.yaml
sensor:
  - platform: thermal_comfort
    sensors:
      thermal_garden:
        friendly_name: Garden
        temperature_sensor: sensor.outdoor_temperature
        humidity_sensor: sensor.humidity
      thermal_office:
        friendly_name: Office
        temperature_sensor: sensor.indoor_temperature
        humidity_sensor: sensor.indoor_humidity
      thermal_livingroom:
        friendly_name: Living Room
        temperature_sensor: sensor.ble_temperature_a4c138d89167
        humidity_sensor: sensor.ble_humidity_a4c138d89167
      thermal_bedroom:
        friendly_name: Bedroom
        temperature_sensor: sensor.ble_temperature_a4c138b6d248
        humidity_sensor: sensor.ble_humidity_a4c138b6d248
      thermal_workshop:
        friendly_name: Workshop
        temperature_sensor: sensor.atc_353bc7_temperature
        humidity_sensor: sensor.atc_353bc7_humidity
      thermal_laundryroom:
        friendly_name: Laundry Room
        temperature_sensor: sensor.atc_e136c7_temperature
        humidity_sensor: sensor.atc_e136c7_humidity
And now it's finally time to decide if a window should be opened. For the decision, I check if the absolute humidity inside is higher than outside i_hum > o_hum and if the inside temperature is higher than outside i_tmp > o_tmp. The latter makes the air exchange more efficient.
The calculation can be done with binary template sensor:
- /config/packages/thermal_comfort.yaml
template:
  - binary_sensor:
    - name: Ventilate Workshop
      unique_id: thermal_ventilate_workshop
      icon: mdi:fan
      state: >
        {% set o_hum = states('sensor.thermal_garden_absolutehumidity') %}
        {% set o_tmp = states('sensor.outdoor_temperature') %}
        {% set i_hum = states('sensor.thermal_workshop_absolutehumidity') %}
        {% set i_tmp = states('sensor.atc_353bc7_temperature') %}
        {{ i_hum  > o_hum and i_tmp > o_tmp }}
Repeat for the setup for the other rooms. The sensor will show On if you should open the window and Off if it's not recommended: