RetroPie Revision 2
Not too long ago I built a Retropie based console. It was small and portable, but it still required an HDMI enabled TV or projector. And sometimes you will go places where that is not available - on a 3 week camper van vacation for example 
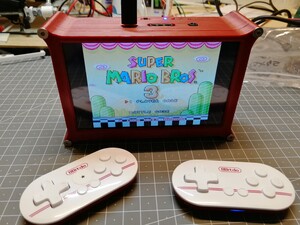
So during the last weeks I revisited the project to make it even more portable by adding a screen and builtin speaker.
Screen
So I wanted to add a screen to make the Pi more portable. Size wise it should be big enough that two people can see it comfortably but small enough to still be portable. 5 inches seemed to be about the right size for this.
The Raspberry Pi supports three ways to add a screen:
- HDMI
- GPIO
- DSI
There are quite a few 5 inch screens that attach via a little HDMI coupler to the Pi. However I still want to be able to attach the box to a TV or a projector when available, so permanently blocking the HDMI port does not work.
The second method is to attach a screen directly to the 40 GPIO pins. This method is mostly used by smaller screens, but there are some in the 4 to 5 inch range. However these screens seem to use all GPIOs the Pi has, leaving none for the various additional electronics I want to add (see below).
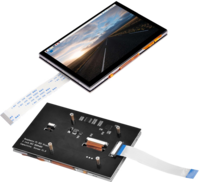
That leaves the DSI connector. Officially there is only one compatible screen that can be connected there: the 7 inch official display by the Raspberry Pi foundation. I was about to give up when I found out that there actually are some unofficial screens supporting the DSI. The one I picked is the OSOYOO 5 Inch TFT.
It works just as advertised: Connect it using the included ribbon cable and you're good to go. No drivers or anything needed, just a current Rasbian based distribution (such as RetroPie).
Electronics
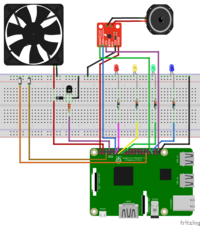
The electronics are similar to the first iteration. We still have a fan controlled with a transistor, 3 LEDs to signal the current temperature and another LED for power/activity indication1). We still have a button to turn the Pi on and off.
New is another button that is used to toggle through a set of volumes 2).
The big addition is the I2C audio controller. While the Pi has it's own audio out via a headphone jack, I had not so good experiences in using that for a built in sound. The little Sparkfun breakout for the MAX98357A makes it easy to add digital audio to the Pi using only three GPIO pins.
Adafruit has a good tutorial on how to use it with the Pi.
Attached is a 2 Watts 8Ω speaker I still had around. The mono sound is good and loud enough for retro games in my opinion.
Check the wiring diagram and refer to the following table on how everything is connected.
| 3.3V | 5V | VIN (I2S Audio) | |
|---|---|---|---|
| BCM 2 | 5V | VIN (Fan) | |
| Power Button | BCM 3 | GND | GND (Fan) |
| BCM 4 | BCM 14 | Fan Control | |
| GND (I2S Audio) | GND | BCM 15 | |
| Red LED | BCM 17 | BCM 18 | BCLK (I2S Audio) |
| Yellow LED | BCM 27 | GND | |
| Green LED | BCM 22 | BCM 23 | |
| 3.3V | BCM 24 | ||
| BCM 10 | GND | ||
| BCM 9 | BCM 25 | ||
| BCM 11 | BCM 8 | ||
| GND | BCM 7 | ||
| BCM 0 | BCM 1 | ||
| BCM 5 | GND | ||
| Volume Button | BCM 6 | BCM 12 | |
| BCM 13 | GND | ||
| LRCLK (I2CAudio) | BCM 19 | BCM 16 | Blue LED (Activity) |
| BCM 26 | BCM 20 | ||
| GND (LEDs/Buttons) | GND | BCM 21 | DIN (I2C Audio) |
Software
Please refer to version one of this project for the general RetroPi setup first!
The box is meant to be used as either a standalone console, using the builtin screen and speaker or to be attached via HDMI and direct all output to the connected TV. Unfortunately, it is not possible to switch dynamically between DSI and HDMI output at runtime.
By default, the Raspberry always uses the DSI display when it is attached. By putting a ignore_lcd=1 line into the /boot/config.txt the DSI display can be ignored on boot.
To be able to use both, we need to detect if something is attached to the HDMI, check what configuration we currently have and if necessary switch the config and reboot. And while we do that, we also switch the configuration needed for the audio output.
All this is done by the setoutput.sh script in this repository. The repository has configuration files for /boot/config.txt and /etc/asound.conf. Stuff in the *.BASE files are always applied and stuff in the *.LCD and *.HDMI files only apply in the appropriate mode.
In addition we still need some software to handle the temperature LEDs, fan and the new volume button. This is done in the control.py script of the same repository.
Both scripts are called from /etc/rc.local:
- /etc/rc.local
# switch output and reboot if needed
/home/pi/retroportable/setoutput.sh

# run the temperature watch script in the background
/home/pi/retroportable/control.py >/dev/null &
Case
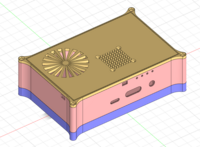
Of course, with the screen the whole thing no longer fit into the tiny little case I used for revision one of the project. I needed something custom, so I decided to 3D print a case.
My usual go-tos TinkerCad and OpenScad seemed not to be the right software to model a rather complex thing like this, so I decided to finally dive into Fusion 360.
I found their community super friendly and helpful to help me over the first hurdles and with a lot of Youtube tutorials I mastered the basics well enough to get a working design.
The Fusion 360 design and the resulting STL files are available online.
The case is held together with 4 45mm 3M screws. 2.5M screws are used to attach the PI, the audio breakout and the fan. The speaker is attached with a simple slide mechanism.
The three parts are meant to connect through a ridge/groove mechanism, but I found that I had to cut off the corners of the ridges to make it fit better.
All in in all it came out quite good and I learned a lot. If I ever go for a version three I would probably get rid of the ridge/groove mechanism and would try to find a way to fasten the display without exceeding the screen dimensions.
Portability
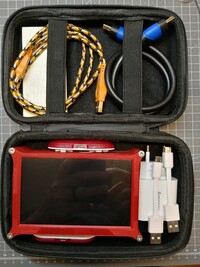
Portability was still my main goal with the build. However with the screen the size of the console itself grew substantially. It would no longer fit into the travel case together with my 8bitdo SF30 Pro controllers. Instead of getting a bigger case, I decided to try smaller controllers.
Probably the smallest controller available is the 8bitdo Zero. It's absolutely tiny, but still seems usable. I will give it a try for a while to see how it works. At home, the SF30 Pro will of course be the default.
